
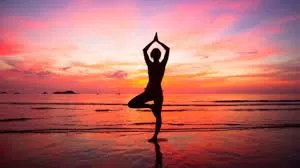
It is traditional to perform Surya Namaskar, or “Sun Salutation,” upon waking. The sun gives the earth its energy to sustain life. A little bit of the sun can be found in everything you put into your body, including the air you breathe. To get the most out of it, you need to figure out how to “digest” the sun better so that it becomes part of your body.
The word “Kriya” comes from the ancient Indian language of Sanskrit. The Sanskrit word kri, which means “to do,” is the origin of this word. The word “kriya” means “action, deed, effort” in English. Sun Salutations are technically a kriya, the proper term for describing this yoga sequence.
There are 12 movements that make up the Surya Namaskara ritual. It is not just a bunch of yoga poses, despite what most people think. Surya Namaskara Kriya has to do with the sun and using the solar plexus to raise solar energy in the body.
When it comes to broadening one’s horizons, the human body can be both a great help and a big problem. Body urges prevent them from moving ahead. Aligning with the sun’s cycle can help you reach a state of balance and openness in which your body is no longer a barrier.
What exactly is Surya Namaskar
Surya namaskar means “sun greeting” or “sun salutation” in Sanskrit. If so, then Surya Namaskar is a salutation to the sun. This ancient practice is a set of twelve steps that gradually raise the body’s temperature to get it ready for yoga. That’s why it kicks off every yoga session—to set the tone. The warming sequence has been used for hundreds of years and is known to be good for health and well-being in many ways. Find out more about this well-known, age-old yoga technique by reading on.
The Practice of Surya Namaskar
Doing asanas in the sun’s rays is a lovely idea, but why exactly should we do Surya Namaskar? Let’s understand it. As stated earlier, Surya Namaskar is made up of 12 movements that work together to give you the most mental and physical benefits. Surya Namaskar can be used both as a standalone practice and as a warm-up for other yoga postures.
By working to strengthen and stretch every muscle in the body at the same time, it gives the body a general sense of “opening.” By circulating this life-giving energy, or prana, throughout the body, Surya Namaskar can help keep our minds and bodies in check. By practicing Surya Namaskar, you can get in tune with the sun’s rhythms.
Harmonizing your physical cycle with that of Sun’s
Surya Namaskar, also spelled “Sun Salutation,” is practiced to bring one’s physical cycles into harmony with the sun’s cycles, which last for roughly twelve and a quarter years. It’s not a coincidence that there is always the same number of postures or asanas. If your system is healthy, working well, and in an open state, its cycle will naturally match up with the sun.
As a form of exercise that works the body from head to toe but doesn’t require any special equipment, it works the whole body with little time and effort. Being in tune with the moon’s cycles is another advantage young women have.
Origin Stories of the Surya Namaskar Ritual
According to the Vedas, everything in the universe has a male and female aspect. Gayatri, the sun’s feminine side, is portrayed as nurturing and life-giving in Hindu mythology. In Hindu mythology, Surya is the male part of the sun. He gives energy, turns things on, and wakes them up.
Gayatri represents yin energy, while Surya represents yang. Our intention during sun salutations is to prepare the body for the asana (posture) that will follow.
Despite popular belief, Surya Namaskara Kriya is performed with one’s back to the rising sun. The goal of warming up with sun salutations is to feel the sun’s stimulating and warming rays on your spine. In ancient times, people would turn their backs to the rising sun after greeting it with a deep bow and prayer.
Heat energy revitalizes the body through the practice of Surya Namaskar, just as Surya gave life to the world through his mighty energy.
Effects of Performing Surya Namaskar
Yoga in general and Surya Namaskar in particular are being looked at to see if they can help with physical and mental health. A number of new studies are starting to come out. As Western and Eastern medical practices merge, more and more people are learning about the energy benefits of Surya Namaskara. Some of these advantages and the link between Surya Namaskar and the chakras are discussed below.
1. Positive effects on physical health
Surya Namaskar is a series of yoga poses that can be done at any time of day. However, they are most helpful when done at sunrise, when the sun’s rays have the most power to wake up the body and mind.
Slow, medium and fast tempos are all acceptable when performing Surya Namaskar. Stretching is better when you move at a slower pace, and muscle tone is better when you move at a medium pace.
2. Good for the heart
Fast Surya Namaskar rounds are good for the heart and can help with weight loss. In addition to strengthening the heart, Surya Namaskar also increases blood flow. It also improves systolic blood pressure, diastolic blood pressure, and pulse pressure at rest.
By breathing in a rhythmic way during Surya Namaskara, the amount of oxygen in the blood is raised. The circulation of blood and oxygen to the organs is enhanced. Rhythmic breathing and exercise have beneficial effects on the heart’s muscle tone.
3. Provides more Oxyzen to your lungs
When you breathe in time with the movements of Surya Namaskar, you help your body keep a steady rhythm. This lets the lungs be more completely emptied, making room for more oxygenated air to come in.
Lung alveoli are dilated, stimulated, and cleaned on a larger scale. The alveoli are an important part of the respiratory system because they help exchange oxygen when you breathe. Slightly larger than a pinhead in diameter, alveoli contain air. Their job is to transport oxygen and carbon dioxide (CO2) through the circulatory system.
4. Aids in digestion and bowel movement
Surya Namaskar involves directly putting pressure on, massaging, stretching, and toning the gut muscles. This is good for the health of the digestive system and other body systems. This helps the body get rid of waste more efficiently.
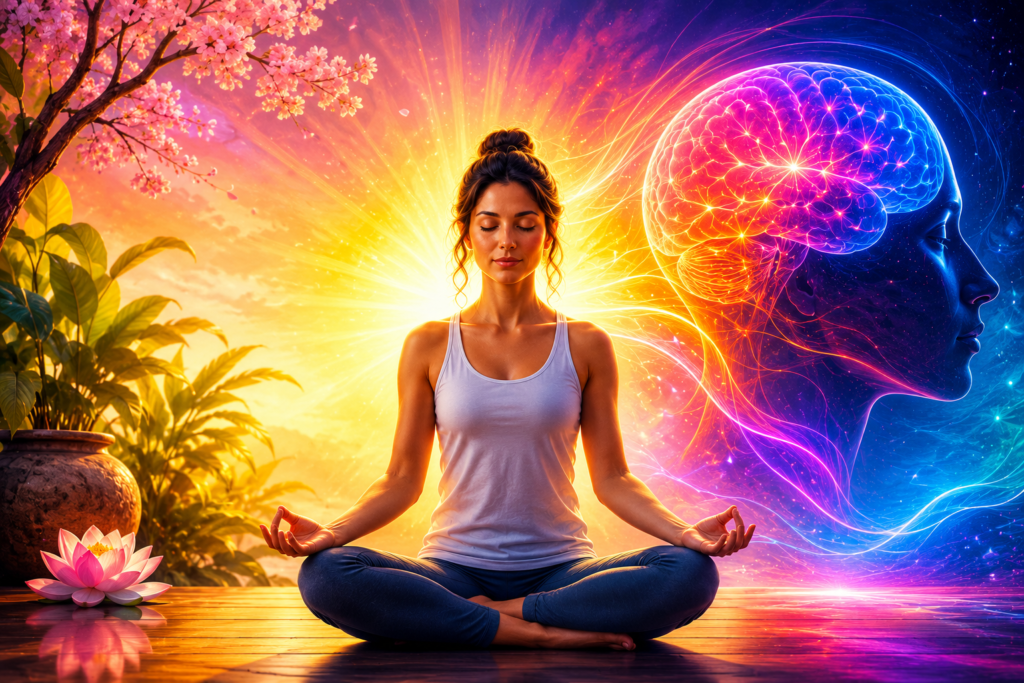
5. Improves Mental Health
It’s good for your mind to do this regularly. Consistent practice of Surya Namaskar enhances concentration, boosts self-esteem, and promotes self-control. Regular practice has been shown to help with the management of anxiety, depression, and insomnia because of the calming effect it has on the nervous system.

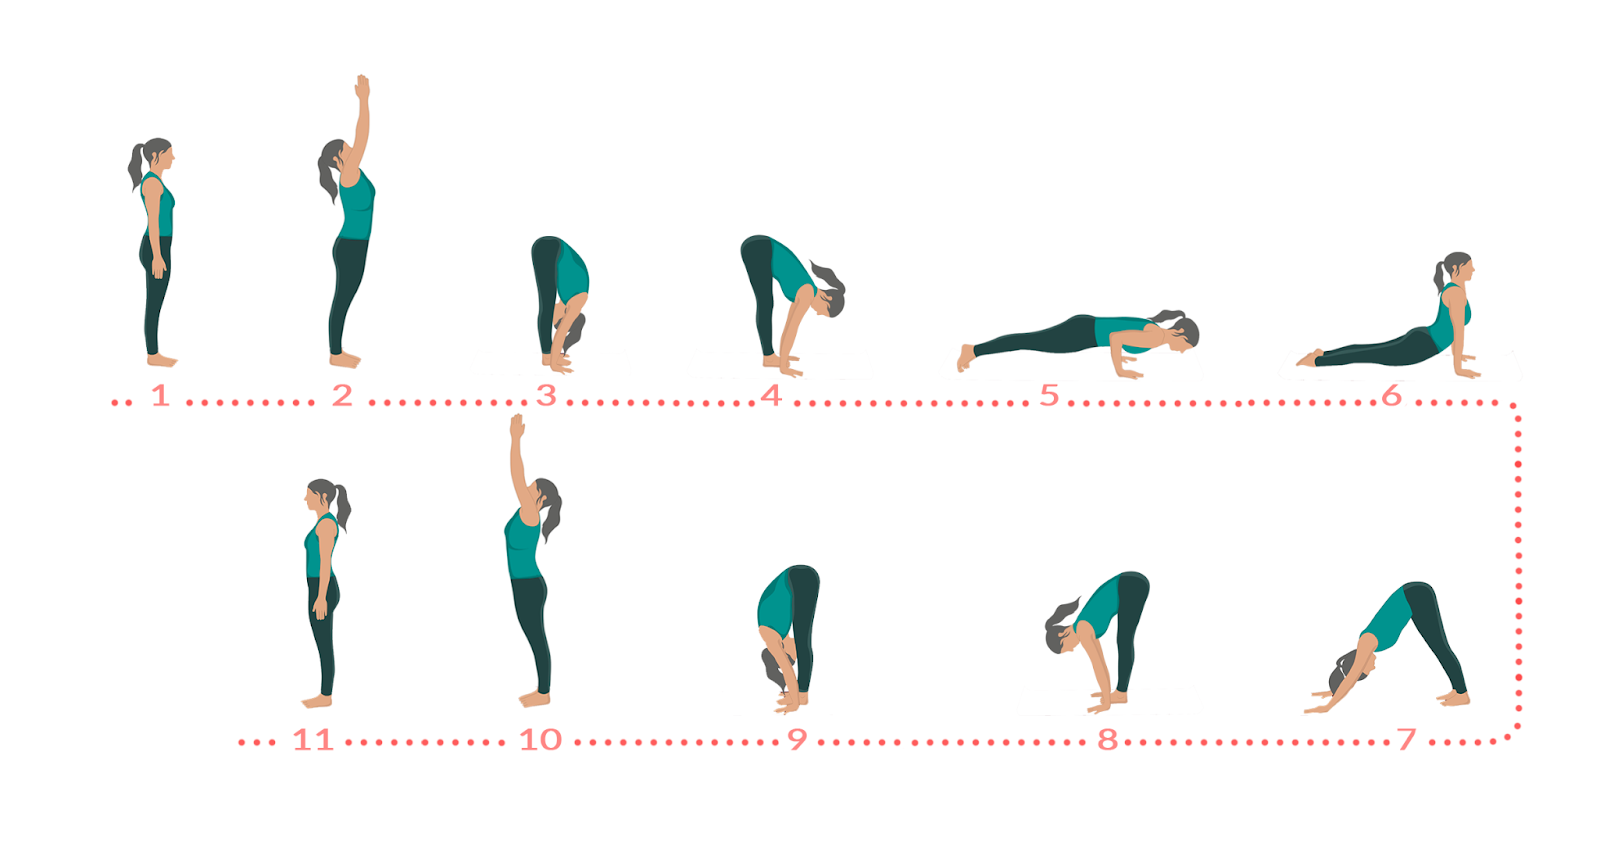
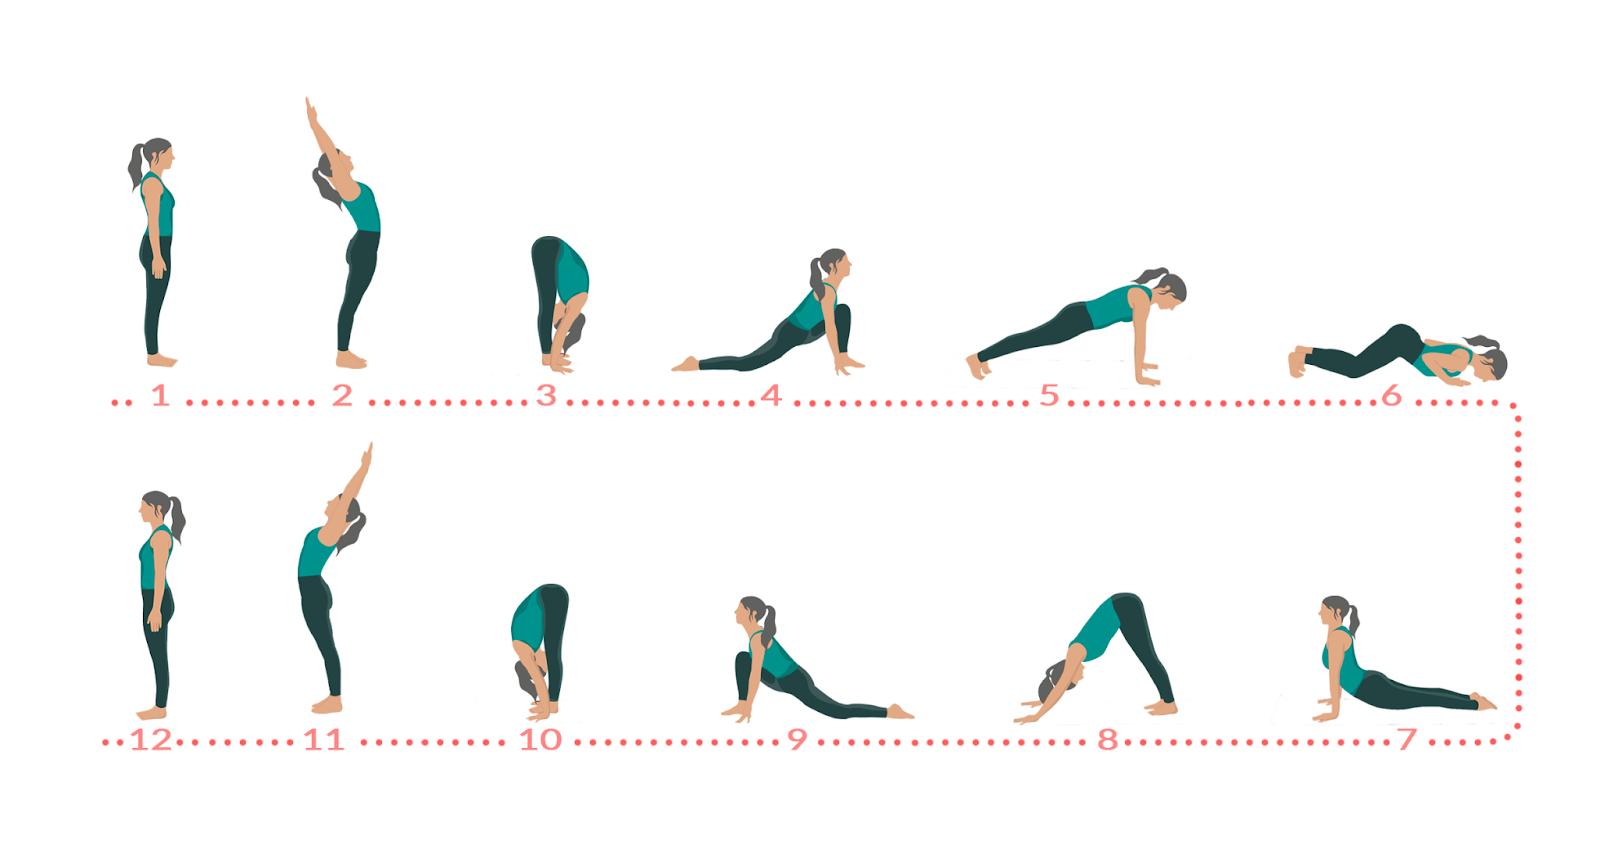
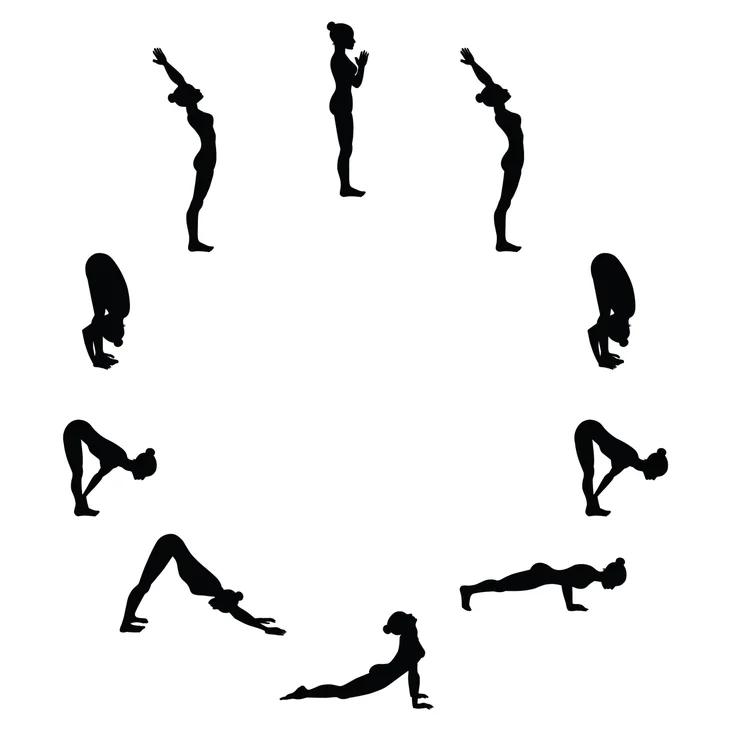
The steps to perform Surya namaskar
Step 1: Prayer position – Pranamasana
Execution: Position yourself at the far end of your mat, keep your feet together, and distribute your weight evenly across both feet.
Release some tension in your shoulders and open up your chest.
Take a deep breath in and bring both of your arms up from the sides of your body.
Exhale, then bring your hands together in front of your chest in a prayer stance, palms pressed together.
Tip for increasing the depth of your yoga stretches: Activate your feet and stand on them as if they were tripods.
Engage your lower body and remember to maintain your spine straight.
Step 2: Raised arms position – Hastauttanasana
Execution: Take a deep breath in, and then raise your arms up and back. This is the execution.
Check to see that your biceps are not too far away from your ears.
Put in the effort to stretch your entire body, beginning with your heels and working your way up to your fingertips.
Yoga Stretch Deepening Tip: A helpful hint is to rotate the pelvis forward just a touch.
Reaching up with your fingers rather than leaning backward is a better option.
Step 3: Hasta Padasana, or the hand-to-foot pose
Execution: The movement is done by letting your breath out and bending forward from the waist while keeping your back straight.
Exhale, and slowly lower both hands to the ground next to your feet as you complete the movement.
Yoga Stretch Deepening Tip: Bring your palms down to the floor by bending your legs and bringing them closer together.
Put up a little bit of effort to get your knees into alignment.
Maintain a still position with your hands in this position.
They should never be moved before you have completed this third step.
Step 4: Equestrian position – Ashwa Sanchalanasana
Execution: Take a deep breath in and then extend your right leg as far behind you as possible.
Place your right knee on the ground, and while doing so, slowly glance up.
Check to see that your left foot is precisely positioned in the middle of your hands as you deepen your yoga stretch.
Step 5: Stick pose – Dandasana
Execution: Take a deep breath in, and then slowly bring your left leg back behind you.
Align your entire body such that it forms a straight line.
Tip for Enhancing Your Yoga Stretch: Make sure your Arms Are Upright on the Floor
Step 6: Salute with eight parts – Ashtanga Namaskara
Execution: As you let out your breath, slowly and carefully lower your knees to the floor.
Slide forward while bringing your hips back slightly.
Put your chest and chin down on the floor and relax.
Raise your rear end just a tiny bit.
Yoga Stretch Deepening Tip: You should be able to touch the ground with all eight parts of your body, including both hands, feet, knees, chest, and chin.
Step 7: Cobra posture – Bhujangasana
Execution: Step into the cobra posture by sliding forward and then lifting your chest into the air.
In this position, make sure that your elbows are bent and fixed.
Maintain a distance between your shoulders and your ears.
Gaze slowly upwards.
Yoga Stretch Deepening Tip: Take a deep breath in, then exhale while gently moving your chest forward.
Exhale, and while you’re doing so, make a slight effort to pull your navel in toward your spine.
Put your toes in this space.
Be sure that you are stretching to the fullest extent that you are capable of while ensuring that you do not push your body past its capabilities.
Step 8: Mountain posture – Parvatasana
Execution: Exhale completely and then lift both your hips and your tailbone up.
Create an inverted V pose by bringing your chest down toward the floor.
Yoga Stretch Deepening A word of advice: Try to keep your heels on the ground as much as you can.
Put out a reasonable amount of effort to raise your tailbone.
Continue to stretch your body further as you go.
Step 9: Equestrian posture – Ashwa Sanchalanasana
Execution: Take a deep breath in and step forward with your right foot so that it is in between your hands.
Place your left knee on the ground in front of you.
First, sink your hips, and then lift your chin.
Tip for deepening your yoga stretch: Position your right foot directly in the middle of your two hands.
Check that your right calf is positioned such that it is perpendicular to the floor.
Your hips simply need to be pushed down toward the floor with a moderate amount of effort in order for the yoga stretch to become more intense.
Step 10: Hand-to-foot pose – Hasta Padasana
Execution: Let out your breath and step forward with your left foot.
Remember to keep your palms on the floor.
If you are experiencing any discomfort, you can try bending your knees.
Tips for Enhancing the Depth of a Yoga Stretch: Gently straighten your knees, and if you are able to, try to touch the tip of your nose to your knees.
Don’t forget to keep breathing.
Step 11: Raised Arms Pose- Hastauttanasana
Execution: Take a deep breath in and roll your spine up,
Raise your hands over your head and lean your body slightly rearward.
Put a little bit of outward pressure on your hips.
Yoga Stretch Deepening Tip: A useful piece of advice is to position your biceps so that they are next to your ears.
Try to focus more on stretching upwards rather than stretching backward.
Step 12: Standing Mountain posture – Tadasana
Execution: Exhale, then immediately begin to align your body in a vertical position.
Bring your arms back to your sides.
Relax while you’re holding this yoga stance to get the most out of the stretch.
When you do the sun salutations, pay attention to the feelings that come up in your body.
As a last step, you should lie down and do Yoga Nidra to completely rest your body. The body requires a considerable amount of time to readjust to the impact of the stretches that you perform throughout your sun salutations. It has the potential to make both the mind and the body feel better.
Advisable Method: Perform as many as two rounds, pausing in between them as needed.
Restriction or contraindication: high blood pressure, heart disease, or being pregnant
benefits of performing Surya Namaskar.
Doing Surya Namaskar every morning has proven to be beneficial to millions of people all over the world. Some of the main benefits are listed below:
- Helps to strengthen the digestive system as a
- Whole and keeps you from getting constipated.
- It refreshes the nervous system and raises blood pressure.
- It strengthens the lungs and makes a person healthier overall.
- Increases secretory output in the glands.
- Helps cut down on excess fat.
- Increases core and limb strength.
- It improves health on all fronts and makes one more focused and confident.
Types of Surya Namaskar
Surya Namaskar has changed over time into a number of different styles, and its positions have taken on a wide range of different looks. In addition, this is one of the yogic kriyas that has never shrunk but has rather grown with time. In fact, the Surya Namaskar sequence is used in a number of different styles of yoga. Let’s look at them in more detail in the next section:
Ashtanga Surya Namaskar:
The sun salutation, which is part of the Ashtanga Surya Namaskar series, can be done in two ways: Type A and Type B. Type A includes a total of nine vinyasas, whereas Type B includes a total of seventeen vinyasas.
Hatha Surya Namaskar:
It is accomplished by moving through a series of poses called the “12 spinal poses,” which place a significant focus on breathing in a conspicuous manner. It is one of the types of Surya Namaskar that is done the most frequently and is perhaps the simplest to perform.
Iyengar Surya Namaskar:
Iyengar Surya Namaskar is quite similar to the Hatha practice; however, in this variation, the emphasis is placed a little bit more on tempo and energy, and as a result, it is done at a more rapid rate than the other varieties of Surya Namaskar.
This series of poses is just a set of movements that start and end with Tadasana. The sequence begins and ends with Tadasana (Mountain Pose). The poses will lead you through a variety of different stretches, forward folds, and backbends. These movements will generate heat as they are performed in a rhythmic cadence that is in sync with your breath. As you move from one posture to the next, the transition from one stance to the next is initiated by the beginning of an inhale.
This is followed by a pause in both the breath and the body as you come into the pose, and the beginning of an exhale acts as a cue for your next transition. A rhythm emerges from the interplay of breath, motion, and rest. Because the trajectory of the sequence, like the trajectory of the star from which it takes its name, follows a predictable arc and is cyclical, it is simple to become quietly engaged in the looping, repeating motions that are occurring. A movement meditation.
How many times, and for how long shall Surya Namaskar be performed
The number of rounds that must be done depends on a lot of different things about each person. It depends on how to fit you are right now, if you have any injuries or illnesses, and how well you do what you’re doing.
It is in your best interest to take things slowly, getting familiar with the routines and synchronizing your breathing with the movements after five or six rounds. As your power and stamina improve, you’ll be able to increase the number of rounds to six. In the traditional practice of Hatha Yoga, the body is warmed up by performing nine rounds of Surya Namaskar.
If you have high blood pressure, a hernia, coronary artery disease, or any wrist, shoulder, or lower back injuries, it is recommended that you practice a modified version of Surya Namaskar found further below and referred to as the Easy Classical Surya Namaskara. You can find this version of the pose by scrolling down further on this page. Before beginning the practice of Surya Namaskar, anyone who has issues with their spine or back should see a physician. After that, it is recommended to seek variations from a knowledgeable and experienced instructor.
Disclaimer:
The author’s views are his or her own. The facts and opinions in the article have been taken from various articles and commentaries available in the online media and Eastside Writers does not take any responsibility or obligation for them.
Note: Contact our Writers at www.eastsidewriters.com for writing Blogs/Articles on any niche. We have experts in various domains from Technology to Finance and from Spirituality to Lifestyle and Entertainment.

Pingback: Unveiling the Enigmatic Power of the Pineal Gland: A Spiritual Awakening Journey into the Supernatural - Eastside Writers